Brent Yorgason
Most of the analytical tools that we as music theorists have accumulated are designed for the analysis of musical scores. However, a lot of interesting music is not notated in score form. Popular music, jazz, and many types of world music can be transcribed, but exist primarily as sound events that are more effectively preserved in recordings. As twenty-first century educators, we likely want our students to engage with these non-Classical, non-Western styles of music, but to do so, we need to engage directly with sound rather than with notation. Audio timelines can help us to bypass the score to annotate (and analyze) the sound source directly.
The principal software tool for creating audio timelines is Variations Audio Timeliner, which I coded and helped to develop in 2002 at Indiana University as part of the Variations Digital Music Library project. In 2016, I released an updated version of the software called Audio Timeliner. The software is an audio annotation tool that can be used to create “bubble diagrams” representing musical form. The tool can also be used to navigate between sections of music or to annotate audio segments for more detailed analytical study. Basic information about how to use the Audio Timeliner (such as creating bubbles and adding labels, markers, and annotations) can be found in the online Help File (see also Kris Shaffer’s instructional video here).
For educators, the Audio Timeliner is an effective tool for popular music, jazz history, world music, and aural skills classes—where the objects of study are primarily aural—but it is equally useful in classes that tend to focus more on classical genres, such as music theory, music history, or form and analysis courses (as described in Peebles 2013 and Moseley 2014).
In this essay, I explore some of the ways that audio timelines can be used in college-level music teaching. I first describe how timelines can be used in the classroom. Then I examine a set of sample timelines created for specific courses. Next, I describe various types of student projects involving the creation of audio timelines, as well as some effective procedures for grading them. Finally, I look at some ways that audio timelines can be incorporated into research activities.
One of the simplest classroom implementations is to create a timeline before class and to use it to guide the discussion of a piece. Figure 1 presents a very basic timeline which serves primarily as a navigational aid. Here, new sections have been marked with timepoints (creating bubbles), enabling the instructor to quickly jump to precise moments in the piece. The bubble labels help to identify sections quickly, and measure numbers (added as timepoint labels) help students to follow along in a score as they listen.
Figure 2 provides a more detailed timeline that presents a fuller interpretation of a work’s formal structure. It involves multiple levels of bubble groupings and uses colors to visually differentiate thematic ideas. All of the bubbles are given formal labels and markers are added below the timeline to highlight important events not occurring at formal boundaries. Annotations can be added to each of the bubbles to provide further analytical commentary, and are displayed as the music plays in the annotation window. A detailed timeline like this can be used to present your own analysis of a piece of music. This can be part of a guided discussion in the classroom or as a listening assignment outside of class.
A more interactive approach is to create a timeline together as a class. It is certainly possible to start this timeline from scratch, playing the music back and asking students to signal to you when to place timepoints on the line. But I have found that it is more effective to start with a partially completed timeline. For instance, the timeline in Figure 3a provides just the bottom level of bubbles without any labeling, coloring, or grouping. With all of the low-level boundaries marked (and timepoints created), students can focus on interpreting the relationship between the existing bubbles by adding labels, grouping bubbles together, and annotating them to complete the analysis. The final product might look something like Figure 3b. An alternative approach would be to begin with a timeline like Figure 4, which identifies some of the initial themes and broad sections, leaving the rest for the class to determine.
In terms of technology, all that is needed to interact with timelines in class is a computer or laptop that is connected to a projector and a sound system. If your classroom includes SmartBoards, students can use the board to create, edit, label, and annotate timeline diagrams themselves. I have found this to be the best possible solution—it is rewarding to be able to interact physically with musical form at the board.
Audio Timelines for Specific Courses
Next I examine timelines from specific courses to illustrate a few effective techniques and approaches. Figure 5 provides a set of timelines for a jazz history class. One common misconception students have about jazz is that, since it involves improvisation, it is completely free and unstructured. So, an initial pedagogical goal is to help them to hear and understand the formal structure of jazz choruses. Figures 5a–5c visually reinforce the concept of repeating choruses, with AABA choruses in “Night in Tunisia” and “I Got Rhythm” and ABAC choruses in “Riverboat Shuffle.” Figure 5b also includes information about large-scale organization, grouping choruses together by improviser.
Important events occurring within choruses (like solo breaks) can be identified with markers below the timeline. Some of the marked events in “Riverboat Shuffle” are shown in the annotation list provided in Figure 5d. These annotations can help students to acquire basic jazz terminology and associate it with specific sound events as they listen. Figures 5e–5f use the chorus itself as the smallest unit of structure. This broader perspective is useful for modal jazz, where harmonic changes occur much more slowly. Markers are used here to show modal shifts in “So What” and changing chorus speeds in “Blue in Green.”
Timelines can communicate a lot about a performance simply through the proportions of its sections. Sometimes it takes a bird’s eye view to perceive these larger proportional relationships. For example, the uneven proportions in Figure 5g convey quite clearly that Coltrane is the dominant force in “Giant Steps,” playing fifteen choruses to Tommy Flanagan’s four. And, although “Blue Rondo a La Turk” begins with a miniature seven-part rondo (see Figure 5h), at its heart are eight solid choruses of the blues.
In a world music class, timelines can help the instructor to clarify unfamiliar or foreign-language terminology by presenting these terms in sync with the recording. The timelines in Figure 6 illustrate this with a qin piece from China (6a), a kora piece from Africa (6b), and a kriti from India (6c). The complete annotations from the latter piece, “Kriti Banturiti,” are given in Figure 6d. These foreign musical terms (alapanam, anupallavi, caranam, etc.) are new and strange for most students, and since there are no scores for reference, students must rely heavily on their ears. Audio timelines help students to associate sounds with the correct musical terms. The uneven proportions in the timelines shown here also illustrate how formal structure in non-Western styles of music can be less regular and predictable overall, often featuring improvisational sections that do not have prescribed boundaries.
In a popular music course, audio timelines can help students become more conversant about styles with which they are already familiar. By creating timelines, they will learn to identify the principal sections of popular songs, describing them in terms of verses, choruses, bridges, pre-choruses, intros, and outros. The timelines in Figure 7 illustrate that these section types can be arranged in quite a variety of ways, so students will need to be able to identify them by their inherent characteristics rather than their positions in the song. Class discussions about labeling can actually become quite heated as you compare the text, melody, timbre, orchestration, and harmonic structure of each section.
Upper-level bubbles can be used to indicate larger-level groupings in pop music, such as the recurring large-scale patterns in “Take the Money and Run” (Figure 7a) and “More Than a Feelin’” (Figure 7b). Larger sections might also be divided into smaller segments or phrases, such as the AABA verse structure in “Come Sail Away” (Figure 7c). Bubble heights can be adjusted to convey aspects of musical structure as well. For example, the Prechorus and Chorus bubbles in 7c are “bumped up a level” to clarify that they have the same hierarchical weight as the Verse. And in “After the Love is Gone” (Figure 7d), different bubble heights are used to communicate the underlying modulatory scheme.
Timeline colors can be used to convey relationships between sections or to highlight aspects of the text. For example, the rather lengthy bridge section in “Come Sail Away” (Figure 7c), whose style contrasts vividly with the rest of the song, is given strongly contrasting colors. All of the bubbles in “Hero” (Figure 7e) use a different shade of blue, since all of its sections are based on the same underlying chord progression. In “Eleanor Rigby,” different colors are used to represent the two main characters in the song—unexpectedly brought together in Verse 3—and combined colors represent the contrapuntal combination of themes in the final section. Figure 7e provides the full set of annotations for this song, including the lyrics.
Audio timelines are clearly useful for the study of non-notated music. But even in a traditional music theory or music history class, audio timelines can act as a nice complement to score study. The timelines in Figure 8 could be used to discuss a piece with or without a score. Marker and timepoint labels can provide measure numbers, but may be used for many other purposes as well. In Figure 8a, timepoints are used to mark cadence types. In Figure 8b markers are used to indicate the occurrence of leitmotifs within a theme and variations structure. Bubble labels are generally used for formal labels, but some creativity is possible here, too. In Figure 8c, they are used for the prolonged syllables of “Viderunt omnes” in medieval organum, and in Figure 8d, they indicate characters in a piece of program music.
When dealing with classical genres, repeated sections are common. While these are easily ignored in a score, they cannot be dismissed as easily with recorded music, since these repeated sections will take up space on the timeline. Figure 8e illustrates one way of handling this situation: using the label “(repeat)” for any repeated sections. Repeats can also indicated by adding “|: :|” symbols around the bubble label, as in Figure 8f. But these repeats can complicate the visual picture of a work’s form—obscuring the fact that both the Allegretto and Trio sections in Figure 8f are in ABA ternary form, for example—so I have on occasion edited .mp3 files (with Audacity) to remove the repeated sections before creating a timeline.
Figure 8f also illustrates that a rather complex timeline can be visually overwhelming and challenging to read, sometimes with truncated or missing labels. The first of two solutions to this issue is to select a segment of the timeline and click the “Zoom to Selection” button to zoom in on it. The second solution is select a subset of bubbles and choose “Create Excerpt” from the Timeline menu. This creates a new timeline file using only the selected range of bubbles (linked to the original .mp3 file), as shown in Figure 8g, which excerpts the Trio section from Figure 8f. This approach is particularly helpful for longer recordings, such as the 30-minute .mp3 file that is used for Schumann’s Carnaval in the timeline shown in Figure 8h. Any one of the character pieces within this longer work could be excerpted as a standalone timeline without having to edit the original mp3 file.
Although most of the timelines given here depict Classical form types—such as sonata form, rondo form, and ternary form—they can also be used to illustrate processes in modern and minimalistic works. In the timeline for Górecki’s Symphony no. 3, I (Figure 8i) varying bubble heights are used to illustrate the work’s underlying textural processes. The additive processes in Reich’s “Music for Pieces of Wood” are similarly illustrated (using marker labels) in Figure 8j.
Having explored some of the possibilities in the creation and design of audio timelines, I now discuss ways that the Audio Timeliner can be used for student assignments and projects. I focus here on listening assignments (for history, theory, or literature courses), ear-training assignments (for aural skills courses), and aural analysis projects (for theory, form, or advanced analysis courses). I also suggest some techniques for distributing, collecting, and grading timelines.
Listening assignments. Giving your students timelines to listen to outside of class can be part of a flipped approach to pedagogy, helping them to prepare for classroom activities, discussions, or listening tests. Short quizzes could be given after listening to gauge their understanding of the content. Viewing a fully-annotated timeline actually combines aspects of a reading assignment and a listening assignment, since both text and sound are integrated in the timeline. This may help alleviate some common issues: (a) students who do not listen to the music about which they read, and (b) students who do not read about music to which they listen.
Once a timeline has been created for students to view, the first problem to address is how to distribute it to them. Section 1 of the “Timeline Teaching Tips” document on the Audio Timeliner site provides some possible solutions for sharing audio and timeline files using email, an LMS, and Dropbox. It is helpful to provide students with some basic instructions on how to download, install, and use the software as well (see this instruction sheet, which I provide for my students when they are using Audio Timeliner for the first time).
Ear-training assignments. In an aural skills course, ear-training assignments using the Audio Timeliner can help students to develop important listening skills, such as hearing phrases and determining the relationship between them, identifying cadence types by ear, and learning to discern large-scale organizational patterns in music. This set of instructions was designed for a second-year aural skills course, but could be introduced any time after students have learned about phrases, cadences, and simple binary and ternary forms (see also this sample lesson plan). Students can also be asked to describe aspects of texture, timbre, instrumentation, or meter; to identify chord progressions in specific passages (adding Roman numerals as bubble annotations); or to use staff paper to do more detailed melodic, rhythmic, or harmonic dictation for selected phrases or sections.
Aural analysis projects. In a form and analysis or music theory course, students can create an aural analysis of a piece of music by thoroughly annotating an audio timeline. Depending on your aims, this could be completed with or without a score and could be combined with detailed score analysis as well. Here are some sample analysis projects involving audio timelines:
Timeline Projects 1 and 4 are to be done entirely by ear, but the others involve a reference score. In Timeline Projects 1–3, the piece to analyze is assigned by the instructor, but in Project 4, students can choose their own song. Letting students choose their own songs prevents this project from getting too “dated” and engages students by giving them an opportunity to analyze and discuss some of their favorite music. Analysis Projects 1–2 ask students to create a timeline as part of larger project, combining the analysis of musical form with harmonic and motivic analysis.
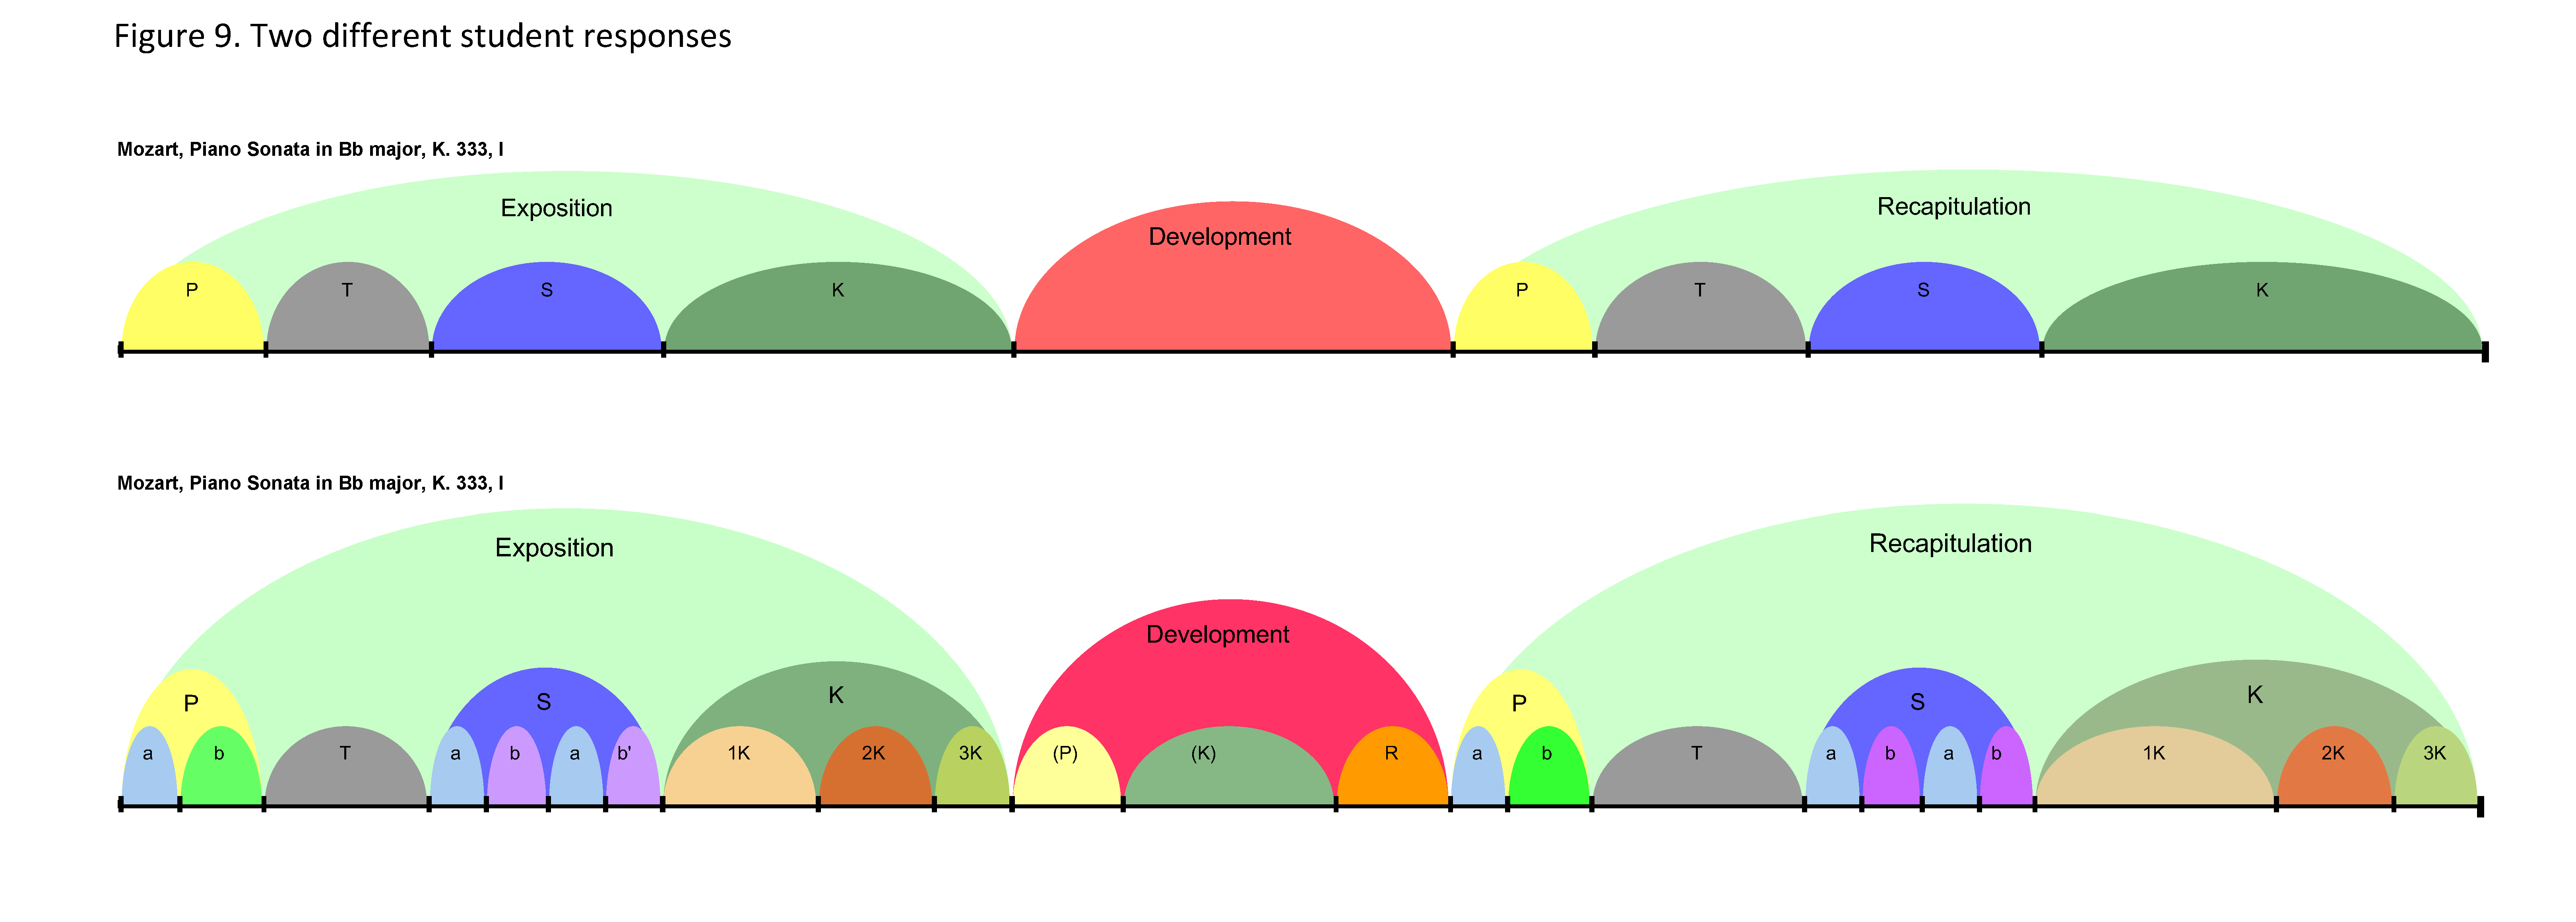
Grading. This sample rubric can be used in evaluating student timelines. Most of the points are earned for accurate structure and labeling, with the rest coming from annotations, markers, and the use of color and design. Be sure to provide sufficient guidance and detail in your instructions or you may receive such disparate results as the two student responses in Figure 9. Both diagrams are correct, with accurate timepoints and labels, but the second obviously involved more time and effort in its creation.
Bubbles and labels can be evaluated fairly easily by simply looking at the timeline, but annotations are a bit harder to evaluate in this way. You can, of course, click through all of the bubbles one by one, but a much more efficient approach is to create an annotation list (using the “Save as Web Page” feature), which provides a list of all of the annotations in the timeline in outline form. This sample annotation list was generated from a student project for Haydn’s Sonata in A-flat major, Hob. XVI/43. Section 2 of “Timeline Teaching Tips” explains how to generate an annotation list and how it can be used to prevent student dishonesty.
The Audio Timeliner can also be used to create publishable diagrams of musical form. Section 4 of “Timeline Teaching Tips” provides instructions on how to use a PDF printer to create a high-resolution timeline diagram, such as this printed PDF of the timeline for Mendelssohn’s Songs without Words,Op. 30, No. 3. If you would like to publish an interactive audio timeline online, several issues arise. Timelines cannot currently be embedded in a browser—they can only be opened in the Audio Timeliner software, which means that the timeline file and the audio file would need to be distributed and viewed offline. One very good alternative is to create a video of the timeline as it plays, using screen-capture software such as Screencast-O-Matic, and publishing the video online. This is what Mark Spicer does for his analysis of Lady Gaga’s “Bad Romance” in MTO 17.3 (Example 4). And since the timeline adds a layer of analytical interpretation to the original song, it strengthens the argument for fair use of the copyrighted material (which is why Spicer is able to use the full Lady Gaga recording in his publication). Audio timelines have also been used rather frequently in conference presentations, which is an effective way of presenting an analysis without needing to “talk over” an audio example.
The analysis of musical form can potentially be very abstract—even farther removed from the music than the score itself. But with audio timelines, analysis is much closer to the performance, connected directly with the sound source. Instead of being more abstract, it can more easily represent our experience of the piece (rather than our interpretation of its score). Audio timelines can also help students develop their aural skills to a more acute degree and allow them to interact with a wider variety of popular and world musics. Carefully prepared timelines engage students more deeply with sound recordings and can visually convey many things that are not apparent from casual listening or score reading. Including audio timelines in our analytical “toolbox” will allow us to deal more directly with sounding music as we strive to incorporate more non-Western, non-Classical genres into our pedagogy.
References
Moseley, Brian. 2014. “Using Criterion-Referenced Assessment to Encourage Active Analytical Listening.” Engaging Students: Essays in Music Pedagogy, vol. 2. Accessed August 3, 2018.
Peebles, Crystal. 2013. “Using Audacity to Participate in Active Musical Listening.” Engaging Students: Essays in Music Pedagogy. Accessed August 3, 2018.
Spicer, Mark. 2011. “(Per)Form in(g) Rock: A Response.” MTO 17.3. Accessed August 3, 2018.
This work is copyright ⓒ2018 Brent Yorgason and licensed under a Creative Commons Attribution-ShareAlike 3.0 Unported License.